Loading Scene Examples
This sample is two rooms and a list of examples. Every entry in the list is one line of the package's API, shown next to the line that runs it — loading screens from a scene, a prefab and a UI Toolkit document, multi-scene loads, reloads and awaited transitions. A persistent HUD reports every operation's phase and progress while it runs.
Installation
Import the sample through the Package Manager.
- Open
Window/Package Manager. - Select
My Scene Managerfrom theIn Projectlist. - In the right panel, select the Samples tab.
- Click on the
Importbutton on theLoading Scene Examplesitem.
The sample assets will be installed to Samples/My Scene Manager/<version>/Loading Scene Examples.
Scriptable Render Pipeline Compatibility
When importing the sample into a project with an active Scriptable Render Pipeline, a dialog will appear asking if you want to automatically upgrade the sample materials. This will upgrade the sample materials for both URP or HDRP.
Adding scenes to Build Settings
The sample reaches its scenes by name, so they have to be in the Build Settings. Nothing is written on import: the Build Settings are project-wide state, so the sample asks first.
Open SceneA or SceneB and enter playmode. If any of the sample scenes is missing, the room is replaced by a prompt:
- Add them, and exit Play Mode adds the missing scenes. The Build Settings are read when playmode starts, so the sample exits playmode — enter it again and the sample will run.
- Leave without changing anything exits playmode and leaves the Build Settings alone.
To take the scenes back out, use the Remove the sample's scenes from Build Settings, and exit Play Mode button in the room UI. Only the sample's scenes are removed; everything else stays.
Playing the Sample
The sample contains two rooms, two loading scenes and two helper scenes:
- SceneA and SceneB — the rooms. Each one transitions to the other.
- Loading_Screen — a uGUI loading scene built from the package's own components.
- Loading_Animated — a UI Toolkit loading scene with a sliding-panels animation.
- Extra — a scene with a spinning prop in it, loaded alongside a room by the multi-scene example.
- SceneListenerHUD — the persistent HUD. Loaded on demand by whichever room you start in, and never unloaded.
Start in either room. The list holds eight examples; click one to run it, and read the line of code underneath to see what ran:
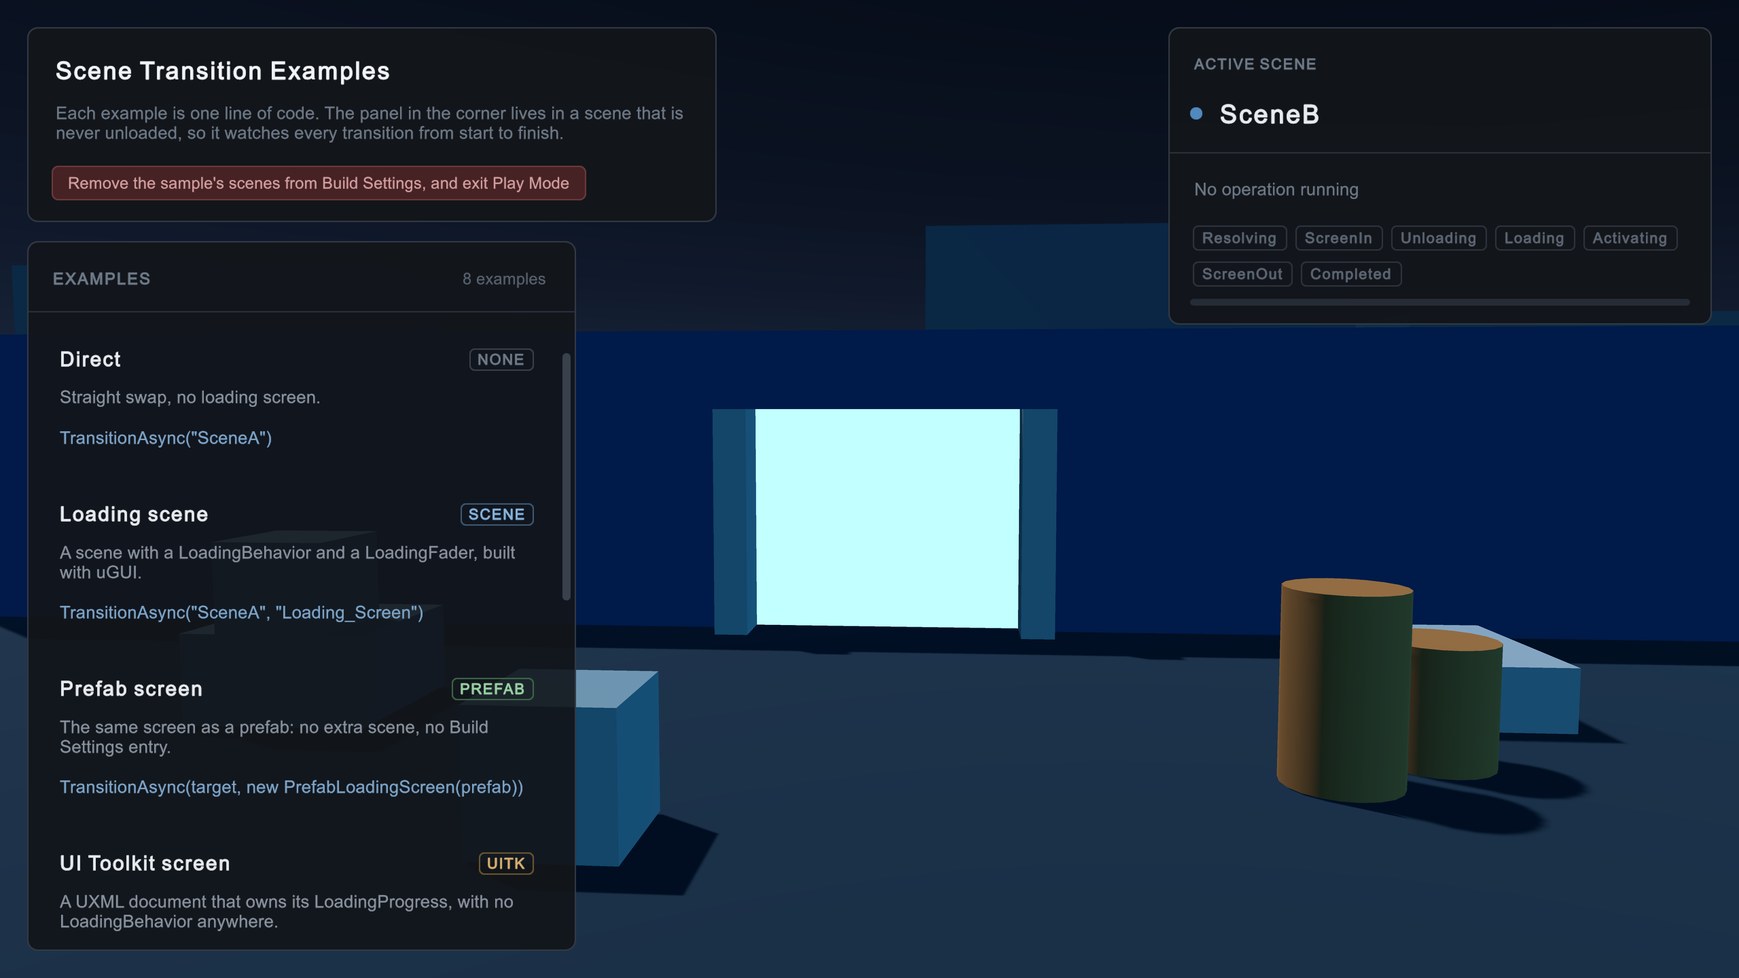
| Example | What it runs | What it shows |
|---|---|---|
| Direct | TransitionAsync("SceneB") | A straight swap, no loading screen. |
| Loading scene | TransitionAsync("SceneB", "Loading_Screen") | A scene with a LoadingBehavior and a LoadingFader, built with uGUI. |
| Prefab screen | TransitionAsync(target, new PrefabLoadingScreen(prefab)) | The same screen as a prefab: no extra scene, no Build Settings entry. |
| UI Toolkit screen | TransitionAsync(target, new UIDocumentLoadingScreen(uxml, panel)) | A UXML document that owns its LoadingProgress, with no LoadingBehavior anywhere. |
| Animated screen | TransitionAsync("SceneB", "Loading_Animated") | A UI Toolkit loading scene whose gates are held until each slide finishes. |
| Reload this scene | ReloadActiveSceneAsync(loadingScreen) | Reloads whatever is active, so the same button works in both rooms. |
| Two scenes at once | TransitionAsync(new[] { target, extra }, loadingScreen) | One operation, two scenes, the first of them made active. |
| Await the handle | SceneResult result = await TransitionAsync(target, loadingScreen) | The operation is awaitable; the result carries the scenes it produced. |
Every loading screen in the sample stays up for at least two seconds, however fast the load turns out to be, so there is time to read what it is showing you.
The operation HUD
The bar at the top of the screen is the SceneListenerHUD scene. It names the active scene, the kind of operation running, its progress, and lights each phase of the operation's lifecycle as it walks through them:
Resolving → ScreenIn → Unloading → Loading → Activating → ScreenOut → Completed
A Cancel button appears while an operation runs. Cancel one mid-flight and the timeline ends in Canceled instead.
The HUD lives in its own scene because a room's UI is unloaded halfway through a transition, so it could never report one from start to finish. Nothing in it uses DontDestroyOnLoad: TransitionAsync only unloads the active scene, so an additively loaded scene simply survives.
Understanding the Examples
Starting a transition
The examples list is a single TransitionExamples component, shared by both rooms as a prefab — only the scene it transitions to differs. Each row pairs the code it displays with the code it runs:
new Example(
    "Loading scene", "SCENE",
    "A scene with a LoadingBehavior and a LoadingFader, built with uGUI.",
    $"TransitionAsync(\"{_targetScene}\", \"{_loadingScene}\")",
    () => MySceneManager.TransitionAsync(_targetScene, _loadingScene)),
Nothing in it reports progress or watches phases — the HUD does that for every operation the sample starts. That is the arrangement worth copying: the code that starts a transition does not have to know anything about the code that displays it.
Two of the rows do a little more. The multi-scene example builds a SceneParameters from an array — the first scene is made active unless the parameters name another:
SceneParameters parameters = new[] { _targetScene, _additiveScene };
MySceneManager.TransitionAsync(parameters, _loadingScene);
And the awaited example is async void, the same shape a button handler in your own project would have. The operation is cancelled if the object goes away mid-flight, which is what CancelWith is for:
async void AwaitTransition()
{
    SceneResult result = await MySceneManager
        .TransitionAsync(_targetScene, _loadingScene)
        .CancelWith(destroyCancellationToken);

    Debug.Log($"Transition finished with {result.GetScenes().Length} scene(s) loaded.");
}
The sample touches MySceneManager from Start, never from Awake or OnEnable. The static manager is created after the first scene has finished loading, so reaching for it any earlier throws when the scene happens to be the first one.
Watching every operation
OperationHud subscribes once and every operation the sample starts reports itself:
void Start()
{
    _manager = MySceneManager.Default;

    _manager.OperationStarted += OnOperationStarted;
    _manager.ActiveSceneChanged += OnActiveSceneChanged;
}

void OnOperationStarted(SceneOperation operation)
{
    operation.Progressed += OnProgressed;
    operation.StateChanged += OnStateChanged;
    operation.Completed += OnCompleted;
}
operation.State is compared against the timeline to light the phase chips, and operation.Cancel() is what the Cancel button calls. See Scene Operation for the handle's full surface.
The loading scene
Loading_Screen is the Creating Loading Screens guide as a scene, built entirely from package components:
LoadingBehavioron the canvas root, anchoring theLoadingProgress.LoadingFaderon the sameCanvasGroup, holding the transition for the length of each fade.LoadingFeedbackSliderandLoadingFeedbackTextdisplaying the progress.MinimumDisplayTime, keeping the screen up for two seconds however fast the load turns out to be.
None of these are wired to each other in the Inspector. Every component below the LoadingBehavior finds it on its parents, and each one that needs the transition to wait takes a hold of its own on the progress gates. The transition waits for whoever releases last.
The prefab screen
PrefabLoadingScreen shows that the loading scene was never the point. The LoadingScreen.prefab it instantiates is the exact same hierarchy as Loading_Screen — the scene is built from the prefab — so the two are identical by construction:
public class PrefabLoadingScreen : LoadingScreen
{
    readonly GameObject _prefab;
    GameObject _instance;

    public PrefabLoadingScreen(GameObject prefab)
    {
        _prefab = prefab != null ? prefab : throw new System.ArgumentNullException(nameof(prefab));
    }

    public override SceneOperationPump.ConditionAwaiter PrepareAsync(LoadingScreenHost host, SceneOperation operation)
    {
        _instance = Object.Instantiate(_prefab);
        // Into the holder scene, so it survives the outgoing scene being unloaded.
        host.Adopt(_instance);

        BindProgress(LoadingBehaviorRegistry.TryGet(_instance, out LoadingBehavior behavior) ? behavior.Progress : null);

        return SceneOperationPump.Completed(operation);
    }

    public override void Dispose()
    {
        if (_instance != null)
            Object.Destroy(_instance);

        _instance = null;
        base.Dispose();
    }
}
PrepareAsync and Dispose are all it writes. A LoadingBehavior anywhere on the prefab is picked up through LoadingBehaviorRegistry and gates the transition; without one, the screen holds nothing up.
The UI Toolkit screen
UIDocumentLoadingScreen goes one step further: no scene, no prefab, and no LoadingBehavior anywhere. It creates its own LoadingProgress and gates the transition on that — everything a loading screen has to do is expressed through LoadingProgress, and a plain C# object can hold one.
public override SceneOperationPump.ConditionAwaiter PrepareAsync(LoadingScreenHost host, SceneOperation operation)
{
    _instance = new GameObject(nameof(UIDocumentLoadingScreen));
    host.Adopt(_instance);

    UIDocument document = _instance.AddComponent<UIDocument>();
    document.panelSettings = _panelSettings;
    document.visualTreeAsset = _visualTree;
    document.sortingOrder = 50;

    _root  = document.rootVisualElement;
    _value = _root?.Q<Label>("value");
    _fill  = _root?.Q<VisualElement>("fill");

    LoadingProgress progress = new();
    progress.Progressed += OnProgressed;
    progress.LoadingCompleted += FadeOut;
    BindProgress(progress);

    // Held before the transition can read the gates, and released when each fade ends.
    progress.HoldShow(this);
    progress.HoldHide(this);

    // Delays the cue rather than the gate, so the screen stays up for its minimum.
    if (_minimumSeconds > 0)
    {
        progress.HoldCompletion(this);
        _root?.schedule.Execute(() => progress.ReleaseCompletion(this))
              .StartingIn((long)(_minimumSeconds * 1000f));
    }

    Fade(0, 1, () => progress.ReleaseShow(this));

    return SceneOperationPump.Completed(operation);
}
The fades run through UI Toolkit's own scheduler, so the screen needs no MonoBehaviour to run a coroutine.
The animated screen
Loading_Animated is a loading scene that is not uGUI. AnimatedLoadingScreen is a LoadingScreenComponent — the base for anything that lives on a loading screen and drives, or waits on, its LoadingProgress. It finds the LoadingBehavior on the same object and, once bound, holds both gates until each slide has finished:
[RequireComponent(typeof(UIDocument))]
public class AnimatedLoadingScreen : LoadingScreenComponent
{
    protected override void OnBound()
    {
        Progress.HoldShow(this);
        Progress.HoldHide(this);

        Progress.Progressed += OnProgressed;
        Progress.LoadingCompleted += SlideOut;

        SlideIn();
    }

    void SlideIn()
    {
        // ...add the "closed" classes so the USS transition runs...
        _left.schedule.Execute(() => Progress.ReleaseShow(this)).StartingIn(Milliseconds());
    }

    void SlideOut()
    {
        // ...remove them again...
        _left.schedule.Execute(() => Progress.ReleaseHide(this)).StartingIn(Milliseconds());
    }
}
The gate opens when the slide finishes, not when it starts, so the outgoing scene is never unloaded behind a curtain that is still opening.
Minimum display time
MinimumDisplayTime is the smallest LoadingScreenComponent the scene uses — it ships with the package, not the sample — and it makes a distinction worth knowing:
[AddComponentMenu("Scene Loading/Minimum Display Time")]
public class MinimumDisplayTime : LoadingScreenComponent
{
    [Min(0)]
    public float seconds = 2f;

    float _shownAt;

    protected override void OnBound()
    {
        _shownAt = Time.unscaledTime;
        Progress.HoldCompletion(this);
    }

    void Update()
    {
        if (Progress == null || Time.unscaledTime - _shownAt < seconds)
            return;

        Progress.ReleaseCompletion(this);
        enabled = false;
    }
}
It holds completion, not the hide gate. Holding the hide gate delays the transition while the screen has already been told to go, so a fade runs to its end and the remaining wait plays out on an empty screen. Holding completion delays the LoadingCompleted cue itself, so the screen stays up and whatever plays it out starts when it should.
Wrap-up
With this sample, you were able to run every shape a transition can take from one list, watch each one through the same HUD, and read three loading screens — a scene, a prefab and a UI Toolkit document — that gate the same transition in the same way.
Use the PrefabLoadingScreen and UIDocumentLoadingScreen scripts as starting points to create your own loading experiences ✨.